One question that often comes up when upgrading your car speakers is how to install car speakers? Is it all that difficult? Can you do it yourself or do you need a licensed professional to get it done?
Car speakers aren’t usually neither expensive nor terribly difficult to install which makes them the single most cost-effective improvement you can make to your vehicle’s audio/video system.
Unless you own a relatively late model vehicle equipped with high-quality premium sound speakers, you are unlikely to be 100% happy about the sound that your car’s speakers deliver.
For that reason, many people seeking sound quality and bass decide to replace or upgrade their car’s speakers. However, you can easily get confused if you look up your vehicle and find multiple speakers sizes listed for a speaker location.
Don’t be confused, we’re here to help, this article will guide and help you make an informed decision.
Finding the right top-rated speakers to fit your vehicle doesn’t have to be confusing. Simply because there are many things that you can do to allow different sizes of speakers to be used in a single location in your vehicle, including “car speakers mounting bracket also called car speakers adapters, which is the most popular maneuver used by car audio professionals. However, some installations can get a bit more involved, particularly if you’re installing component speakers.
Most car speakers come with a wiring harness and a detailed user guide that will provide you a wealth of information and instructions about how to correctly install them. Some brands even include free brackets with their speakers which is great.
Tools you’ll need to complete the job
If you’ve made the decision to venture into replacing your car speakers, you’re going to need to know how to install them. Now, replacing speakers isn’t rocket surgery, but it does require a bit of practice. In the following sections, we’ll show you the instructions to be followed step-by-step to correctly set up your system.
Though most car speakers installations are pretty straightforward, there are still many things that you have to take into consideration including factory speakers location, mounting depth, and height as well as vehicle’s factory wiring. Installing coaxial speakers is a pretty straightforward process, but, as already stated, some installations can get a bit complicated, mainly if you’re installing component speakers.
Your user manual instructions will specify the exact tools you need, and walk you through the process step-by-step.
The tools you probably have around are all that you need to install your new speakers.
The tools you’ll need might include, but aren’t limited to:
- Torx drivers and bits
- A variety of screwdrivers (Phillips, stubby Phillips, flat-blade, and magnetic or offset screwdrivers)
- Crimping tool and connectors
- Wire cutter/stripper tool
- Socket wrench set
- Drill
- Panel removal tool
- Electrical tape
- A Knife
- Retaining clip remover (or a screwdriver covered with a shop rag)
Types of installations
Many online stores including Amazon will help you decide if a given speaker will fit your car. These online stores have huge databases and vehicle selectors to assist you to choose the most fitting speakers for your vehicle. Some speakers will fit easily into the factory speaker opening and use the factory grilles and brackets. Some other sizes will fit with the help of a mounting bracket (some brands include free mounting brackets with their speakers) or with some minor modifications, such as drilling new holes, cutting small areas of metal or pressboard, or filling cardboard to make room for speakers larger than the factory enclosure.
Replacing component car speakers can be a bit tricky, especially if your car wasn’t equipped with a factory component system in the first place. Because component speaker systems consist of different parts, some custom modifications (drilling holes in the door panels or dash) will be required, mainly for installing tweeters, as the woofers will install in your factory locations. In some cars, tweeters can be mounted on the sail panels.
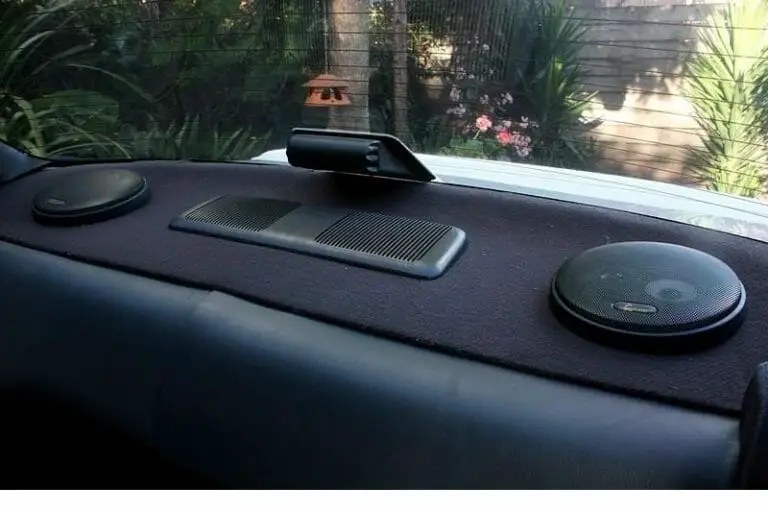
Replacing dash speakers
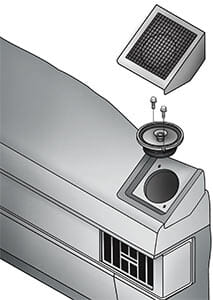
You’ll certainly need a 90-degree screwdriver in order to get at the screws near the windshield. Most dash speakers can be easily reached and replaced simply by removing their grilles, which are held down by some screws or friction fittings.
If your speaker’s grilles are held down by friction fittings, carefully pry them up. It’s very recommended that you use a panel tool to pry up the grilles in order to avoid scratching or cracking the surrounding dash.
In some cases, the whole dash panel should be removed in order to replace your car’s dash speakers. Particularly if their grilles are secured from below by screws or by plastic studs that will break if too much pressure is applied.
Once the old speakers are removed, use your wiring harness to attach the new speakers to the system. Because your dash is subject to temperature and climate extremes, we highly recommend avoiding using electrical tape for securing the connections, as it will deteriorate over time and you’ll run the risk of a loose connection.
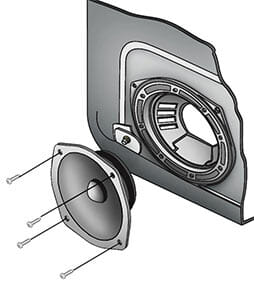
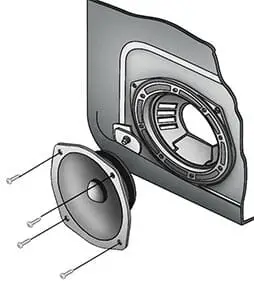
Replacing door speakers
Your car’s door speakers are a hugely important part of good sound. They’re usually easy to replace, but the degree of difficulty involved in getting to them can vary. To replace your vehicle’s door speakers, usually, all you need is to take a screwdriver. Remove the grille, unmount the factory speakers, and swap them out with the new ones. However, in some cases, the whole door panel should be removed.
Your car’s door speakers are a very important part of a good sound system. If a door speaker has been damaged, or if you wish to upgrade to new better sounding speakers, you’ll need to replace the factory speakers which is usually an easy job. However, the degree of difficulty involved in getting to them can vary from car to car. Most factory speakers are fairly easy to replace, and this typically requires the removal of the grille (Sometimes the whole door panel should be removed), the wiring harness, and the speaker itself.
Some grilles are held down by screws or friction fittings and require you to remove the screws or pry the grille to remove the speaker.Our strategy for installing door speakers is quite straightforward. It is as follows.
- Step 1 : For 99% of cars, replacing the door speakers means removing the door panel. So just remove it, and be very careful not to break any clips or electric window wires. Sometimes Removing the door panel is not required as you can easily replace the speakers by simply removing the grille and swapping them out .
In some cars you’ll see a small notched slot in the edge of the grille , so all you have to do is pop out the grille and unmount the factory speakers , this is not always the case , especially with newer cars. - Step 2 : Now , try to Unscrew your stock speaker and detach it from the wiring harness attached to it . Be careful with the speaker, as you might need to reinstall it back if you decide to sell the car later.You might need a sharp tool to cut through some materials (sealant ,foam …) that was used by car’s manufacturers when they first mount the speakers.
- Step 3 : Unplug the factory wiring harness,and attach the new one to you new speaker’s terminals. If your speakers didn’t come with a wiring harness, use a set of posi products to make the connections. It’s highly recommended that you test the speakers before you put them into place . Once that’s done , put your new speakers into the doors ,screw them down nice and tight. If you’re fitting coaxial speakers, you’re all done, so fire up the head unit and check they work. Then pop the door panel back on.
- Step 4 : Make sure the speaker is working, then re-attach the factory grille.
What if I have to remove the door panel ?
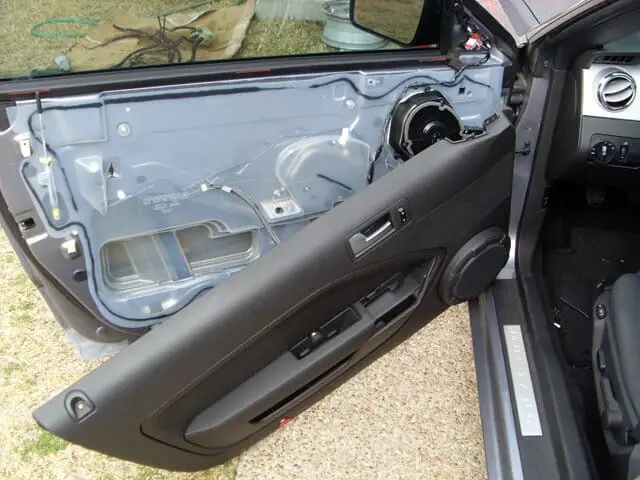
If the process above seems relatively simple, that’s because it really is. As we’ve already stated, it’s very rare to encounter a car that will allow you to replace speakers simply by removing the grille. To install car speakers, replacing door speakers in newer cars tend to take a bit more time and effort because the door panels should be disassembled in order to replace the factory speakers.
Nowadays, even the cheapest cars come with power windows, but some still offer old-fashioned manual windows with a crank. If your car came with a manual system, removing the crank is the very first step in removing the door panel.
You’ll need to pay attention to the electronic control module which is usually built into the armrest which is very often a part of the door panel. This module is responsible for controlling the power windows and locks.
Once your window’s crank removed or its power functions are disconnected, you’ll probably need to remove a few more screws or retaining clips that sill holds the door panel.
When it’s time to remove the panel, use a flat screwdriver and start at a bottom corner and pull the panel out carefully. This is not that hard, but again be careful, if too much force is applied, you run the risk of damaging the door panel which is not what you want.
Once the door panel is unmounted, replace the speakers as described in the previous section, and mount it back.
Modifying your door to custom mount your new speakers
Keep in mind that when you install car speakers, not all speakers sizes can fit a given vehicle. For that reason, modifying your door is mandatory to fit your new speakers. Modifying a car door lets you choose where you want to put your speakers. You can either choose to top-mount or bottom-mount your speakers. This process can get a bit more involved as it involves cutting metal, plastic, pressboard… We highly recommend not to do this if you’re a novice. However, if you decide to go with this approach, you can make things much easier on you if you make use of the factory speaker location to mount the woofer. The custom installation of the tweeter and crossover is covered in the following sections.

Now, as you’re ready to make some room on the door panel to fit your new speakers, you first need to place a template (speaker circle) over the mounting area that you’re about to cut. Observe any obstacles that you might encounter once the speakers are installed. (These obstacles could be: interior door parts, metal, locks, windows…). Once you’re sure your modifications won’t interfere with any other mechanisms, you can lay your panel flat on a hard surface and cut the circle with a sharp utility knife.
Cutting your door’s metal is the hardest part of this process. Use a jigsaw for this operation, and make sure you wear eye protection. Be very careful not to damage the surface. Avoid cutting through the door panel and metal at the same time. If you attempt to cut both layers at once, you might rip the panel covering.
Installing rear speakers
Replacing rear speakers varies from car to car. In some cases, it’s a piece of cake! All you need to do is pry up the grilles and swap out the speakers. In others, you’ll need to fold the seatbacks down in order to be able to remove the old speakers. And in some cases the whole interior panel from the rear deck must be removed, otherwise, you will not be able to get to the speakers.
sdfsdfs